Tool Time!
Most of the hand tools needed to be a RoboGeek… and what they’re used for.
Welcome to Tool Time! Every tool on this page lives in the shop for a reason, and knowing which tool to grab and why is half of what makes you dangerous (in a good way) around a robot. Read on, learn your tools, and know what they are used for. For each section, all tools are labeled by where they live in the toolroom based on their function.
Things you Measure stuff with
Remember the saying, measure twice cut once? Its True! These tools are the most important tools in the shop, and everyone will need to know how to use them.
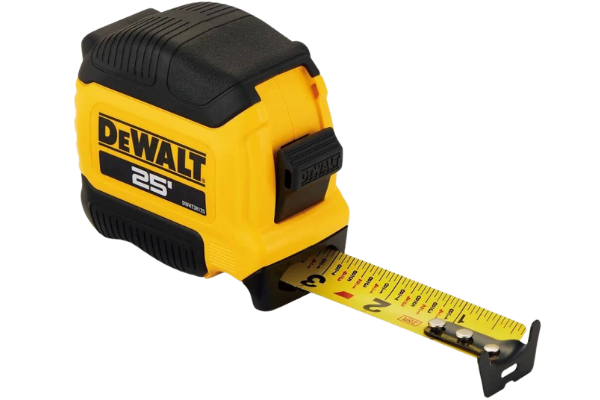
Steel Tape Measure
The everyday shop tape measure. The defacto measuring tool. Everyone needs to be able to read the tape measure accurately — first time, every time.
Reading the tape measure is covered at a shop session near you!
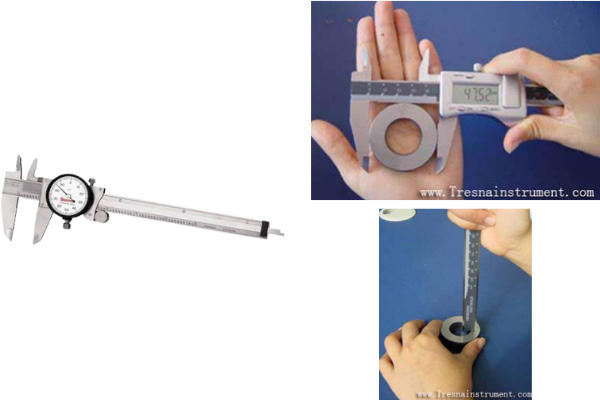
The Dial Caliper
A precision measuring tool. You can use it to measure outside diameters, inside diameters and depth. This is the most important tool in the shop, Period. Used to measure things down to the thousandth of an inch. Every Member needs to learn to consistently measure to 0.001".
Reading the dial caliper is covered at a shop session near you!
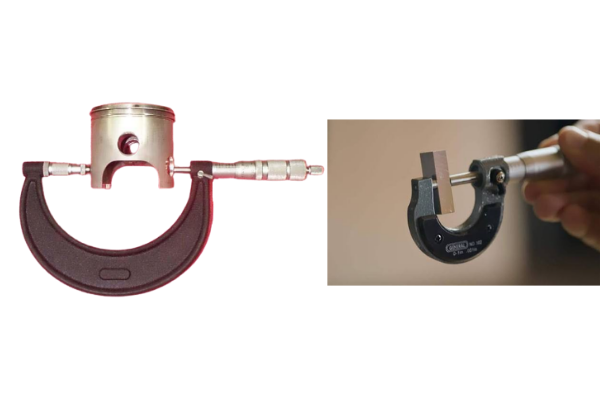
The Outside Micrometer
A high-precision measuring tool, one step up from the caliper. Used to measure things down to the ten-thousandth of an inch.
When you’d choose it
The Lathe and Milling Machine Operators will occasionally use these.
The Spirit Level
What it is
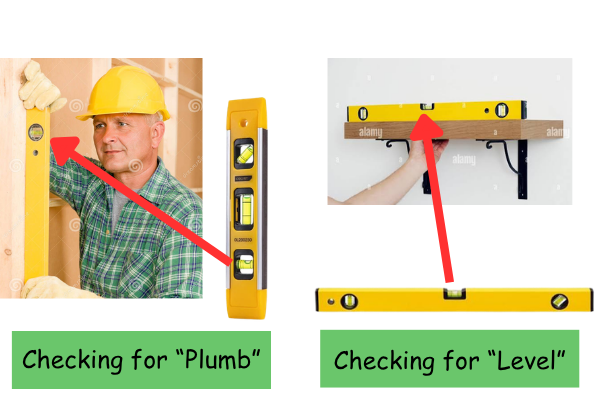
A tool with liquid-filled vials for checking orientation. Typically has 3 vials for all sorts of levelness.
What it’s used for
A spirit level is used to determine if a surface is “level” (parallel to the ground) or “plumb” (perpendicular to the ground). This is Hung on the tool board in the tool room. If your bubble is in-between the two lines, you are level!
Things You Hit Things With
For Marking, Striking and Nailing
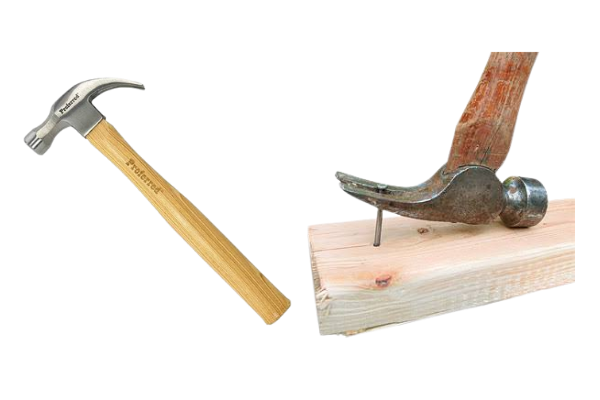
Claw Hammer
Intended for driving and pulling nails.
Ball Peen Hammer
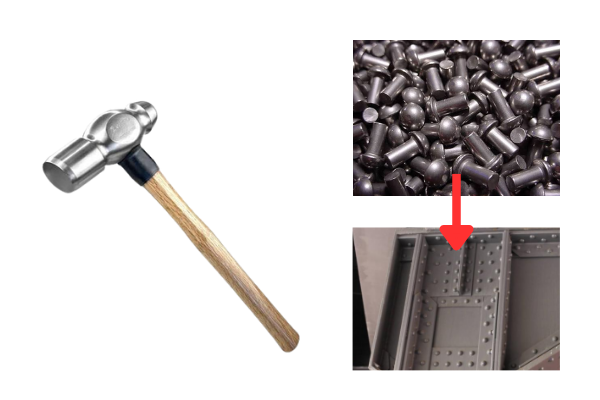
Originally used for installing rivets; also used for striking chisels and punches. Now its used for striking stuff hard!
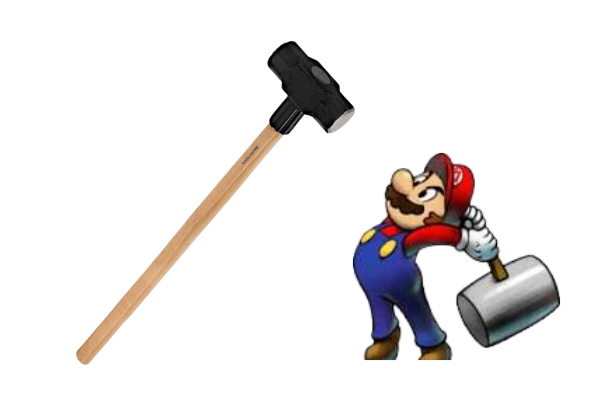
Sledge Hammer
“When You Really, Really Mean It!”
Used for jobs where a large force is needed — driving splitting wedges, bending thick pieces of metal.
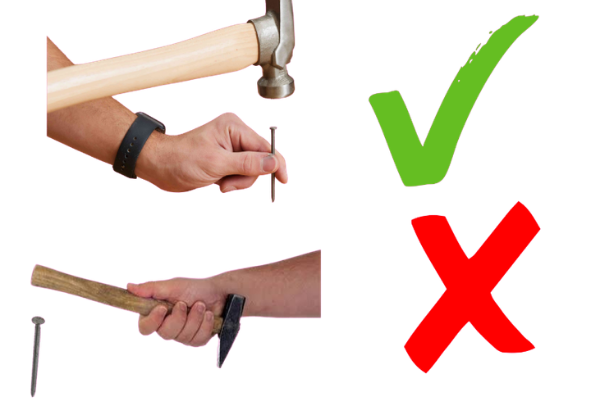
How to Use a Hammer
Always strike the item being struck squarely in the head. Striking any other way will bend the nail, break your punch, launch your tool across the room!
Things You Hit With a Hammer
Its Hammer Time!
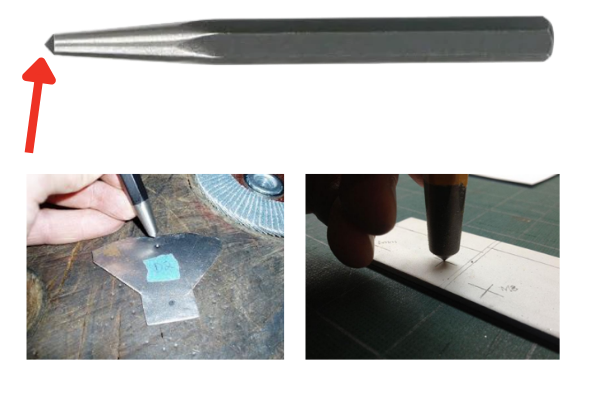
Center Punch
A tool with a sharp, conical point.
What it’s used for
A center punch makes a small impression in a work piece to capture and guide a drill bit when drilling a hole. The punch mark captures the conical tip of the drill bit and forces it to drill the hole where the punch mark is. You will see this EVERYWHERE in the shop.
Things to remember
Drilling with a center punch mark ensures the drilled hole will be where YOU want it.
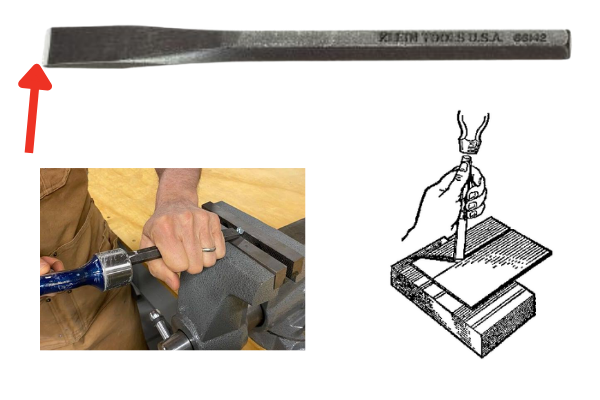
Cold Chisel
A cold chisel has a sharp edge designed to cut or remove relatively soft metal…..such as cold rolled steel. (Hence the name) It can also be used to remove a stubborn nut or bolt by applying a tangent force to break it loose.
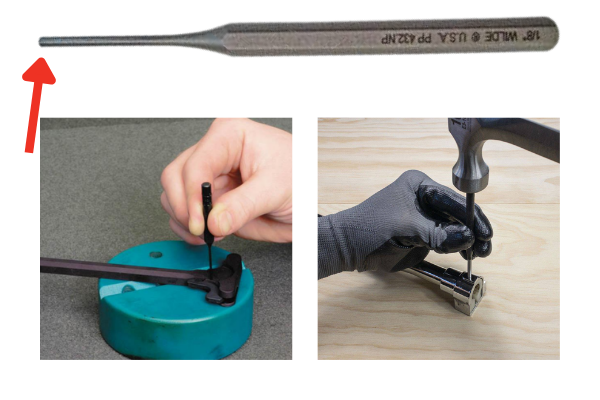
Pin Punch
Pin punches are used to install and remove dowel pins and roll pins. Its got a flat head rather than conical.
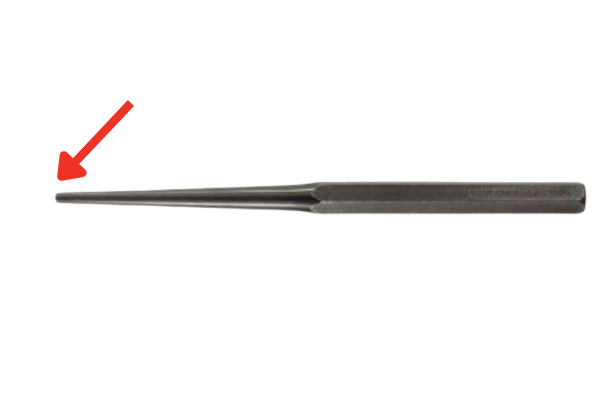
Drift Pin Punch
Also just called a “drift.” It’s tapered rather than straight-sided like a pin punch. A drift pin punch is used to align pieces to insert a fastener such as a rivet or bolt.
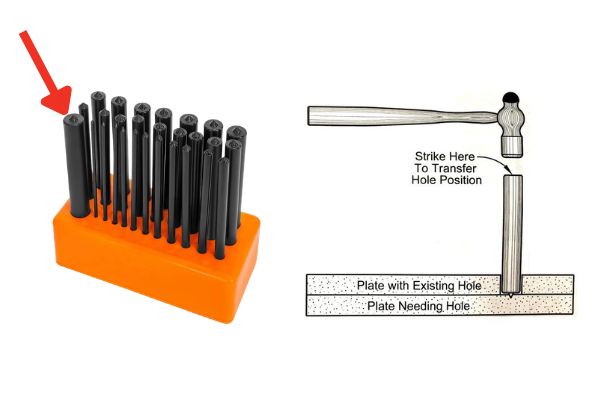
Transfer Punch
A cylindrical punch with a tiny point at the end to transfer holes.
What it’s used for
A Transfer Punch is used to transfer (woah) hole dimensions from one workpiece to another workpiece to minimize layout work. Comes in sets to exactly transfer. DO NOT USE AS A CENTER PUNCH! THEY ARE DIFFERENT!
Things You Grab Things With.
Pinchy Pinchy
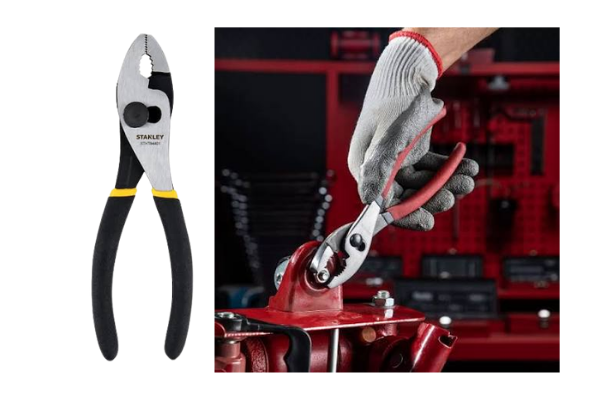
Slip-Joint Pliers
Used for grabbing stuff tightly. The slip joint allows a larger range of sizes to be grabbed.
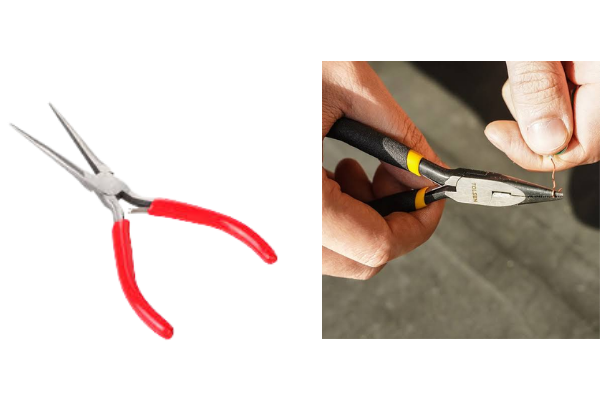
Long-Nose Pliers
Used for grabbing and bending wire and grasping small objects. AKA Needle Nose.
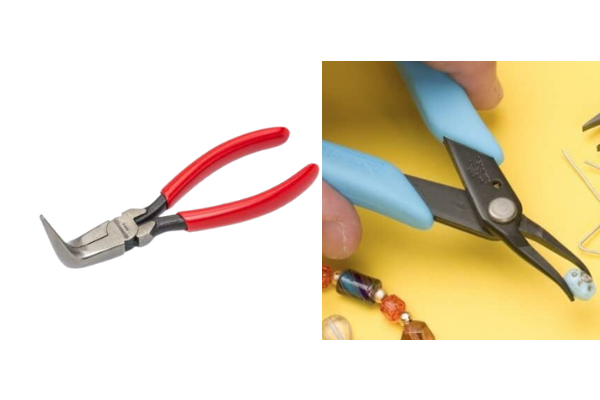
Bent Long-Nose Pliers
Used to reach where regular long-nosed pliers can’t reach.
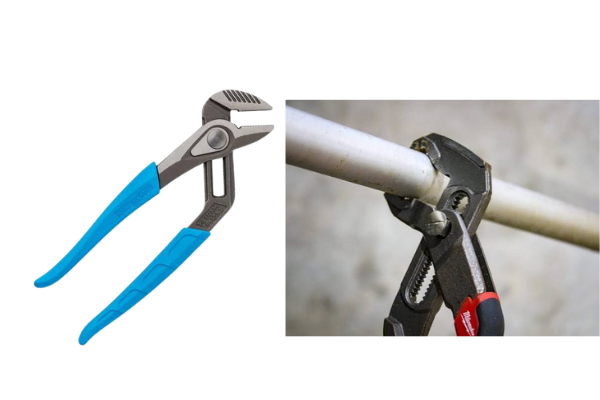
Tongue-and-Groove Pliers (“Channel-Lock” Pliers)
Like the Slip-Joint pliers, Tongue-and-Groove pliers have an adjustable fulcrum point that lets you grab larger pieces — at the expense of the amount of force you can squeeze or grip with. Has more displacement that a typical slip-joint.
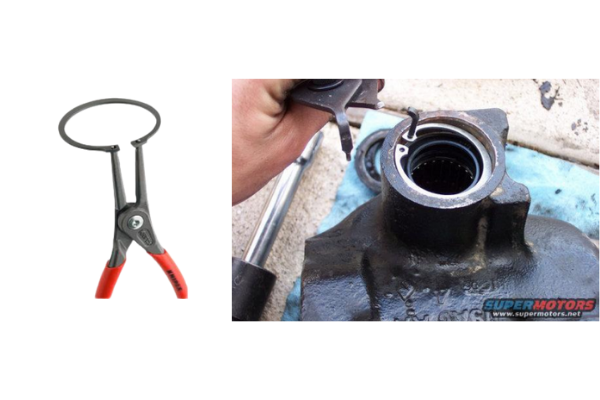
Snap Ring Pliers
Used to install/remove snap rings, circlips, and retaining rings into a groove.
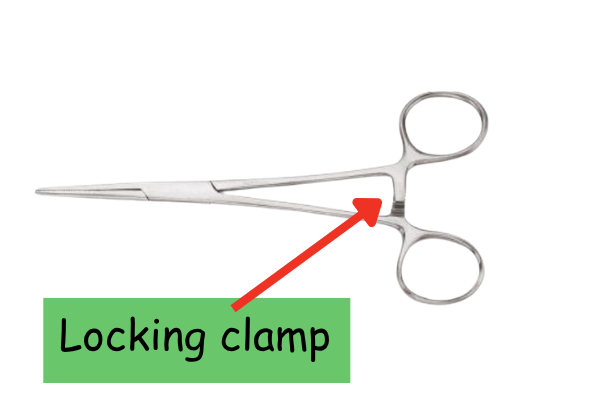
Hemostat (Hemostatic Clamp)
Originally used to clamp off leaking blood vessels. Kind of looks like old timey scissors.
What it’s used for
The ultimate in precision locking needle-nose pliers. These will hold stuff for you when you need an extra hand. They can also reach into tiny robot places and retrieve dropped nuts and washers, as well as get that tiny washer on that little screw waaaay back in there where clumsy fingers can’t reach.
Things to remember
Look for the locking clamp mechanism near the handle — that’s what lets it hold a part hands-free. (The big red arrow)
Things You Cut Stuff With.
Snippy McSnappy
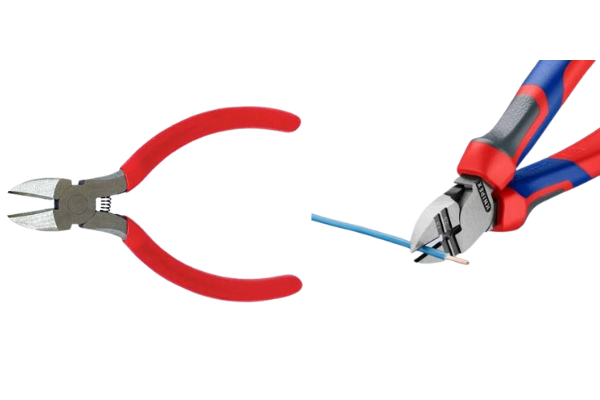
Diagonal Cutters
Diagonal cutters are used for cutting soft wire. Most common for robot wiring. Also does a good job at cutting zip ties. Steel wire will damage the cutters — don’t use them on it.
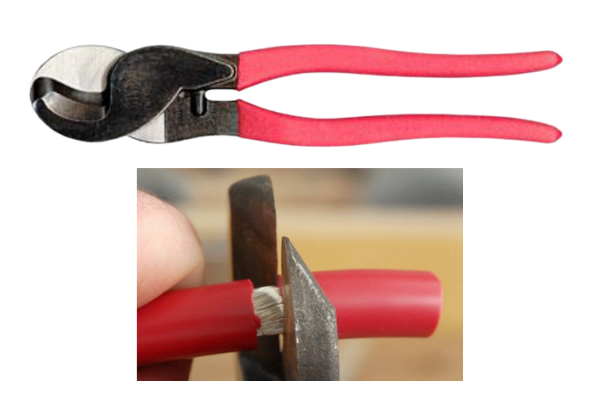
Cable Cutters
These cutters are specifically designed to cut copper cable. They will also do a fine job on a finger if you let them. Keep your fingers clear.
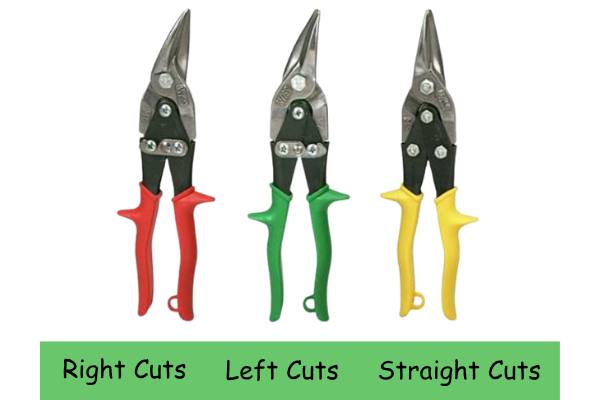
Aviation Snips
Originally used for cutting sheet metal for aircraft fuselages. We’ll use them to cut thin brass sheet, aluminum, certain plastics, and cardboard.
Things to remember
Aviation snips come in three flavors — right-hand cuts, left-hand cuts, and straight cuts. Grab the one that matches the curve or direction you need to cut.
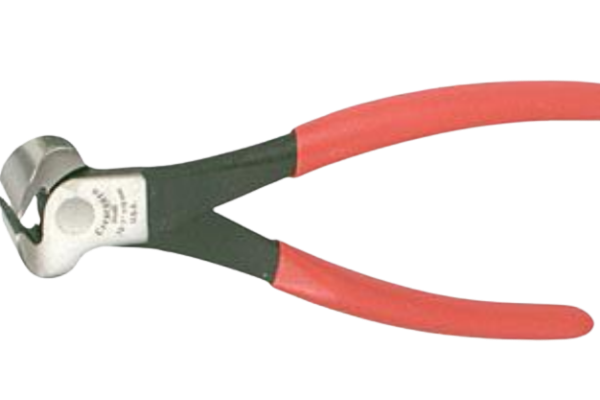
End Cutting Pliers (“Wire Nippers”)
A pincer-style cutter that cuts flush at the very end of its jaws. Really good at pulling stuff and grabbing
Things You Cut Stuff Other Stuff with.
A quick overview of more useful tools that (you guessed it!) can be used to cut other stuff with.
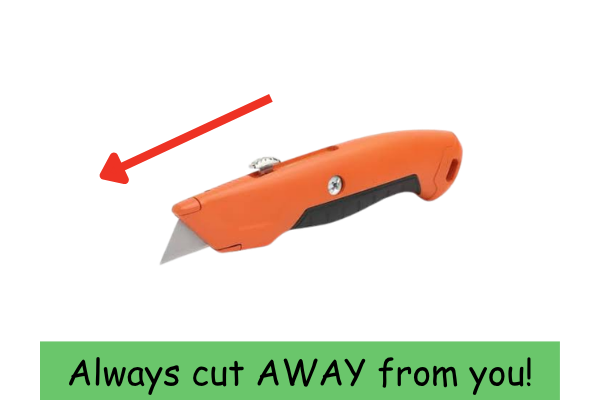
Utility Knife
A Razor Knife that cuts stuff real good, including your fingers. The blade is retractable and replaceable.
Things to remember — Safety
Always keep the blade retracted until ready to use. Always cut away from your body, never toward
Hack Saw
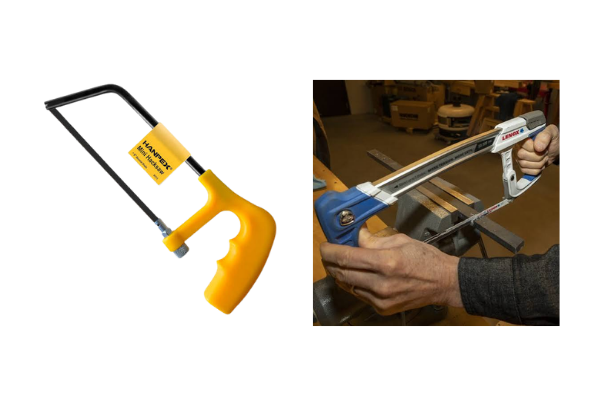
A human-powered metal cutting saw. In order to minimize effort, use it correctly!
How to Use it
Set the blade in the saw so your cutting stoke is in the direction the teeth are pointing. The blade can fit in either way! Make sure to hand it on the tool board when done.
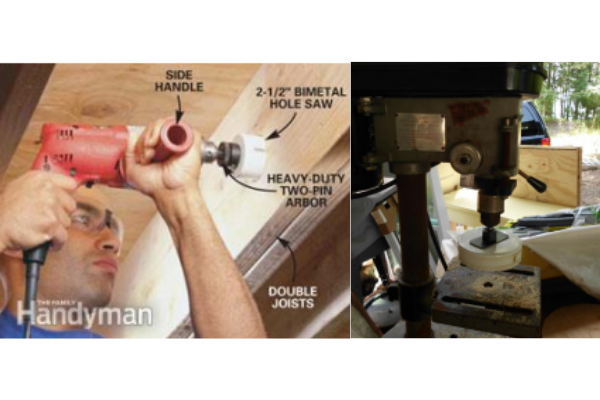
Cup Saw / Hole Saw
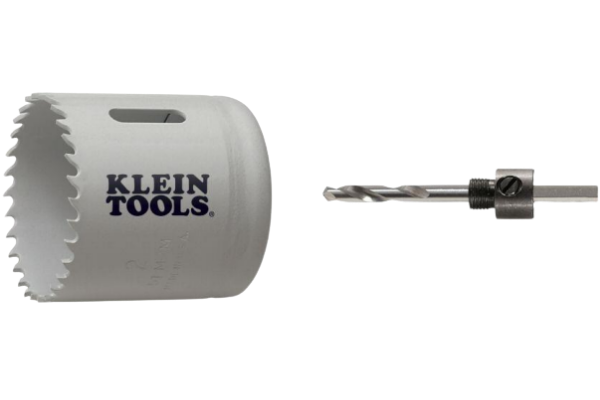
A cylindrical saw blade that screws onto an arbor with a center pilot drill bit, installed in a drill press or hand drill.
What it’s used for
Cutting large-diameter holes. The drill bit first drills a pilot hole; the pilot hole and pilot drill act like a shaft in a bearing to keep the saw centered around the hole axis.
Things to remember — Safety
- Always drill a pilot hole to ensure the pilot drill bit is firmly captured.
- Always use a clamp to ensure the work piece can’t snag on the saw teeth and spin around the drill.
- If you drive a hole saw with a hand drill, be extra careful to firmly grip the drill handles…. hole saws are “grabby” and tend to snag the work piece.
Tools That You Remove Rough Edges and Burrs With
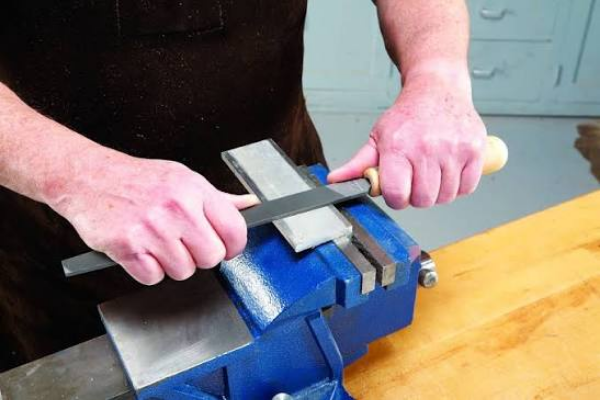
Files are used to remove material. A file can be used to remove sharp edges from pieces you have just cut, to shape pieces, and to flatten a surface.
Things to remember
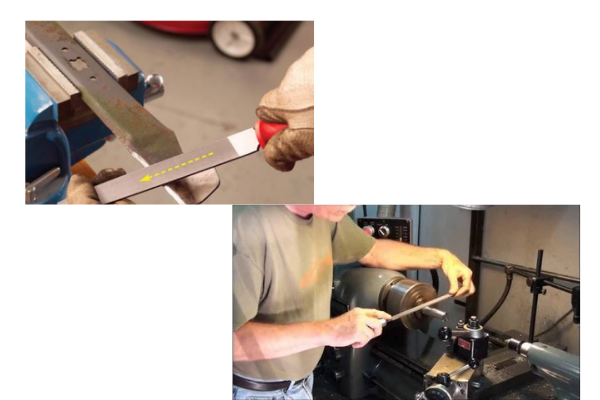
File teeth are designed to cut in the “push” direction only. Trying to cut in the pull motion will eventually dull the file by bending the teeth backwards.
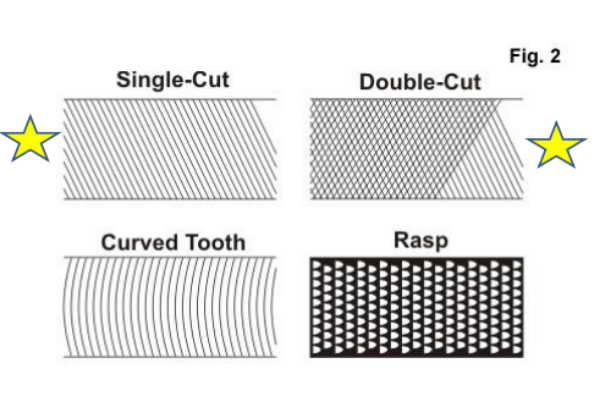
File Types
| Type | Notes |
|---|---|
| Single-Cut | One set of parallel teeth. Most files you’ll use on robots are single- or double-cut. |
| Double-Cut | Crossed sets of teeth, for faster material removal. Most files you’ll use on robots are single- or double-cut. |
| Curved Tooth | Curved rows of teeth. |
| Rasp | A coarse-toothed file designed for very soft metal, wood, or plastic. |
Coarse teeth remove more material and leave a rough surface. Fine teeth remove less material and leave a smooth surface.
Draw Filing
A technique used to smooth a surface — the file is drawn sideways across the work rather than pushed lengthwise.
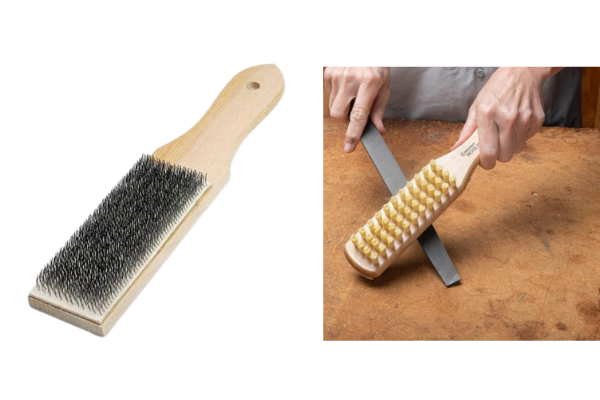
File Brush
Used to unclog the file teeth so it cuts faster and more smoothly. Not needed unless you want to take forever. If you like to make life a LOT EASIER then get a file brush and scrub the teeth clear of little chunky giblets
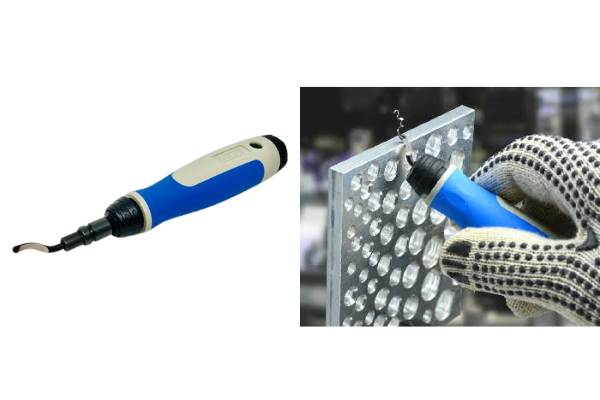
De-Burring Tool
Cutter swivels to help you to get the optimal cutting angle. This hardened steel cutter has a very sharp edge. One of the faster ways to get rid of burrs.
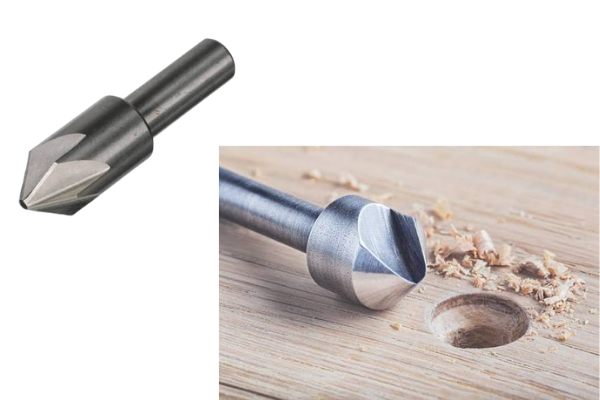
Countersink
Countersinks are used for:
- Deburring small holes (< ½” diameter!) by making a small chamfer on existing holes which effectively removes the burr.
- Making deep countersunk conical holes to allow flathead screws to fit flush in their holes.
Fasteners: Things You Put Stuff Together With
Fasteners come in two basic families based on how you drive them.
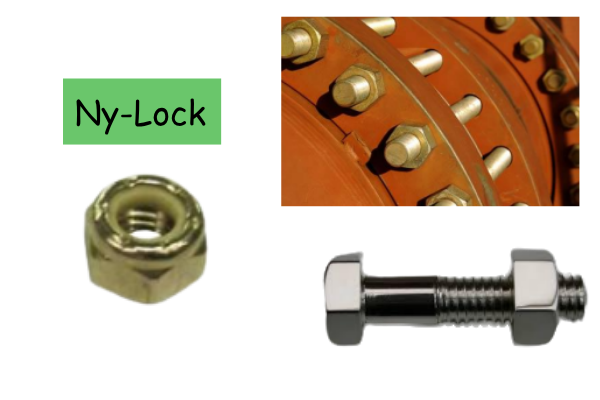
Nuts & Bolts
Fasteners that have external hexagon drive surfaces.
A nut and a bolt — properly threaded together — can create tens of thousands of pounds force, which can be used to clamp things together VERY tightly.
Things to remember
A Ny-Lock hex nut has a white plastic insert that keeps the nut from working loose under vibration.
Screws
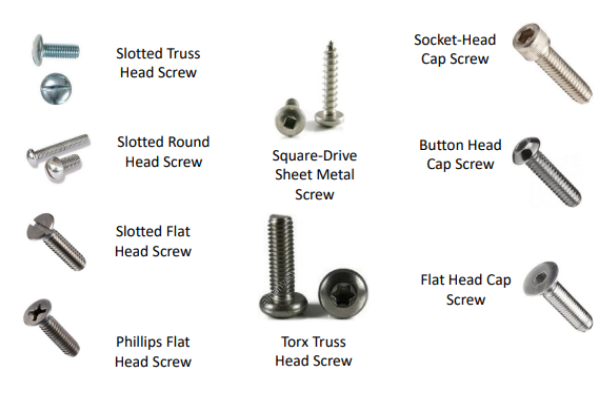
Fasteners that are driven from the end. Screws are named by their shape and by the type of driver used with them.
| Screw | Driver Type |
|---|---|
| Slotted Truss Head Screw | Slot |
| Slotted Round Head Screw | Slot |
| Slotted Flat Head Screw | Slot |
| Phillips Flat Head Screw | Phillips |
| Square-Drive Sheet Metal Screw | Square recess |
| Torx Truss Head Screw | Torx |
| Socket-Head Cap Screw | Hex |
| Button Head Cap Screw | Hex |
| Flat Head Cap Screw | Hex |
Things You Tighten/Loosen Fasteners With.
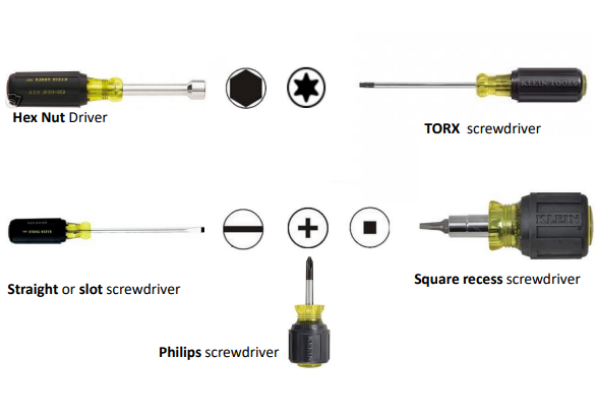
Driver Types
The shape of the tip has to match the fastener you’re driving:
- Straight / Slot screwdriver
- Phillips screwdriver
- TORX screwdriver
- Square recess screwdriver
- Hex Nut driver
All of these tighten when turned to the right, and loosened when turned to the left. Be sure to push inward very hard in order to keep the tip in the slot. Remember Righty-Tighty Lefty-Loosy
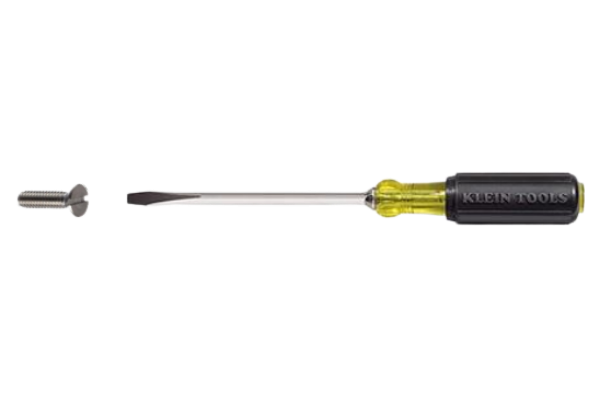
Slot Screwdriver
Drives slotted screws. Make sure to select your screwdriver tip width and thickness to closely fit the slot of a screw to be driven.
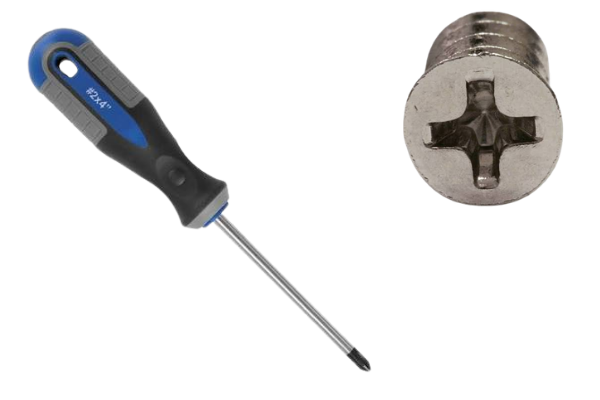
Phillips Head Screwdriver
What it’s used for
Drives Phillips-head screws. Make sure to push VERY HARD inward to prevent from stripping. This is the most prone screw to strip (especially if you are using a hand drill to tighten a screw!)
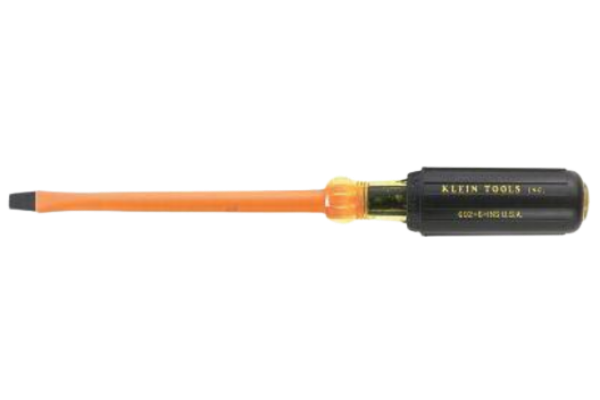
Electrician’s Insulated Screwdriver
A screwdriver with an insulated shaft, easily identified by its orange handle/shaft. An insulated tool is used to prevent equipment damage or bodily harm from high voltage.
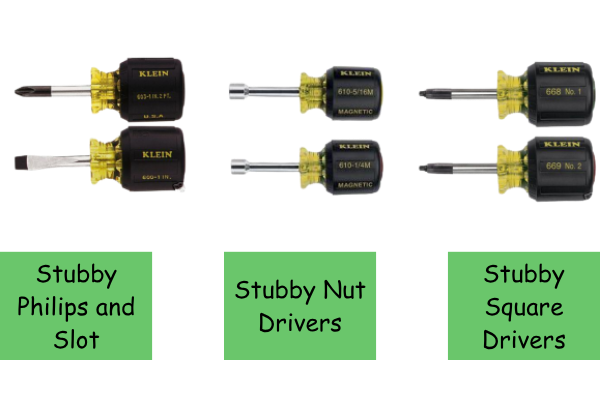
“Shorty” / “Stubby” Drivers
Some screwdrivers and nut drivers are made with very short shanks in order to make it easier to tighten screws in very tight places. Available as stubby Phillips/slot screwdrivers, stubby nut drivers, and stubby square drivers.
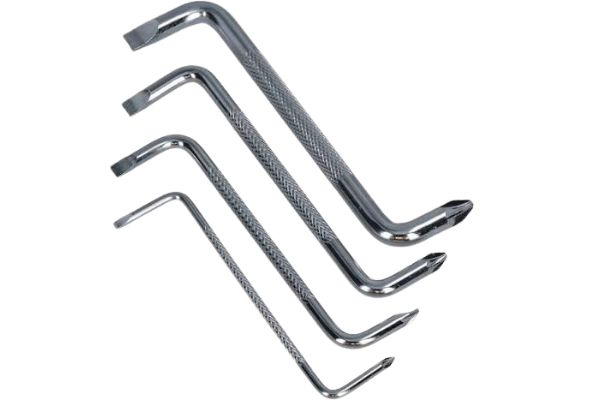
Offset Screwdriver
Used for getting into tight spots. Not often used, but when you need it, nothing else will do!
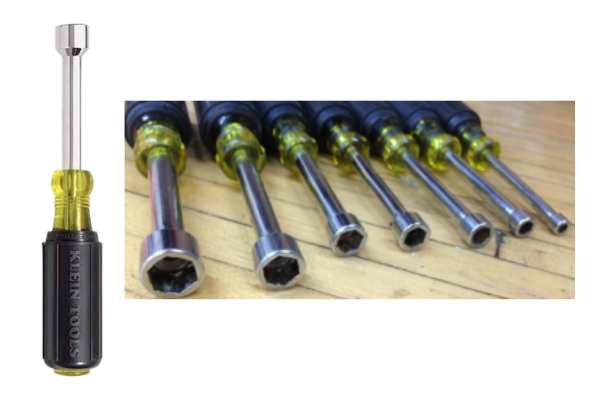
Nut Driver
A tool similar to the screwdriver, but instead of screwing in screws, it turns nuts. It becomes helpful when hex-bolts need to be tightened fast!
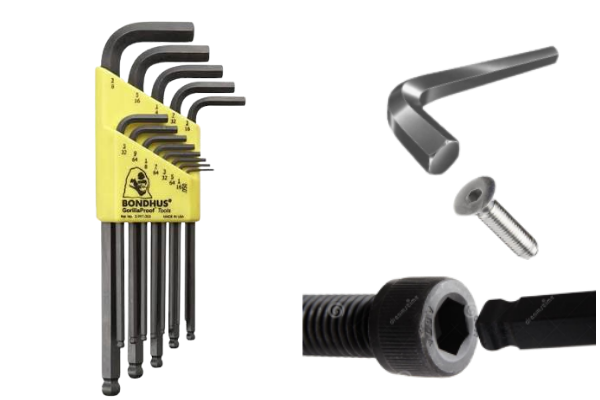
Hex Wrenches
Used for turning fasteners with an internal hexagon drive surface. They are capable of being tightened much more tightly than slot or Phillips screws.
Things to remember
Ball-end hex wrenches can be used at a slight off-axis angle for working in tight spots.
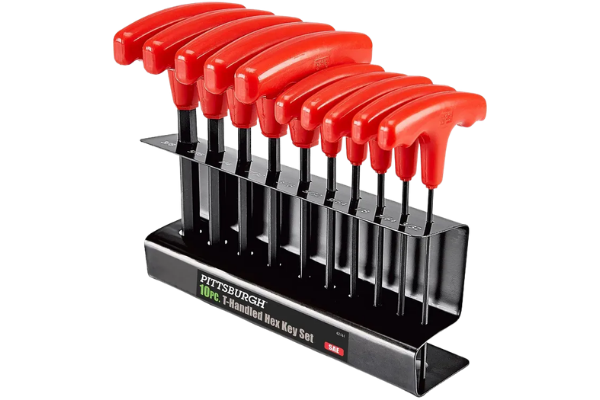
A Tee-Handle Hex Wrench Set is VERY CONVENIENT!, but please put them back! In the CORRECT position.
Wrenches
Used for turning fasteners with an external hexagon drive surface (nuts and bolt heads).
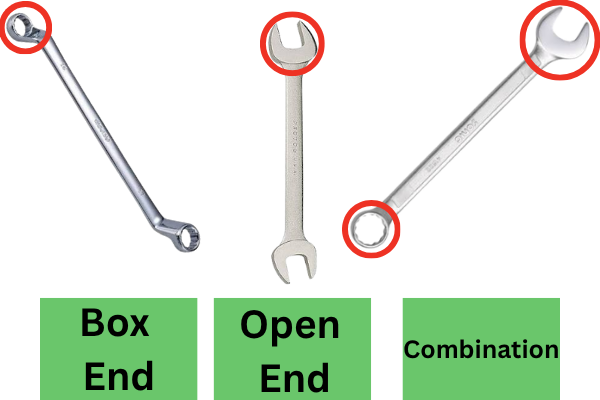
Box End vs. Open End vs. Combination
| Type | Advantage | Disadvantage |
|---|---|---|
| Box End | Stronger — you can apply much more force to remove or tighten bolts. The enclosed opening minimizes the risk of damaging your fastener. | The end is closed, so you must drop the wrench onto the fastener from the end — it can’t be slid on from the side like an open-end wrench. |
| Open End | The end is open, so you can place the wrench over the bolt or onto the bolt from the side. Each end is a different size, so you get more sizes for the same number of tools ($$$). | The open end is weaker than a boxed end — applying too much force will bend the wrench and let it slip off the hex, damaging both the wrench and the fastener. |
| Combination | Combines a box end and an open end into one tool, sized for the same fastener on both ends — the convenient open end for getting into tight places, and the stronger boxed end (won’t “round off” the bolt’s hex shape) for really tight bolts. A 15° offset at each end helps you get into tight locations and keeps you from skinning your knuckles on the work piece. | You only get one size per tool. Box and Open End wrenches allow specalized configuartions on both ends |
The Combination Wrench: “Just about the best of both worlds!”
The Adjustable Wrench
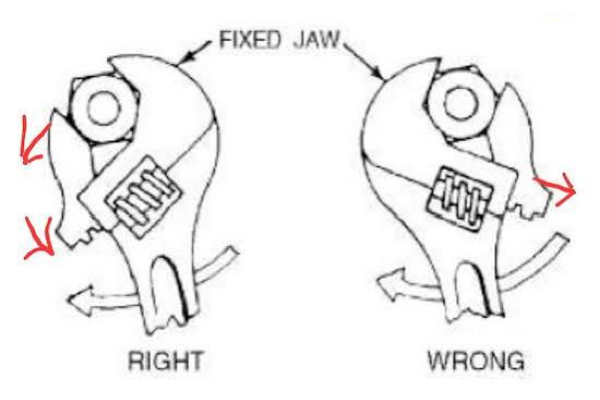
An adjusting screw tightens the jaws onto the fastener being loosened or tightened, so one wrench can fit a range of sizes.
Things to remember
Position the wrench so the tightening force acts on the big, fixed wrench body — not on the little movable jaw piece. Loading the movable jaw will bend it.
Using Any Wrench
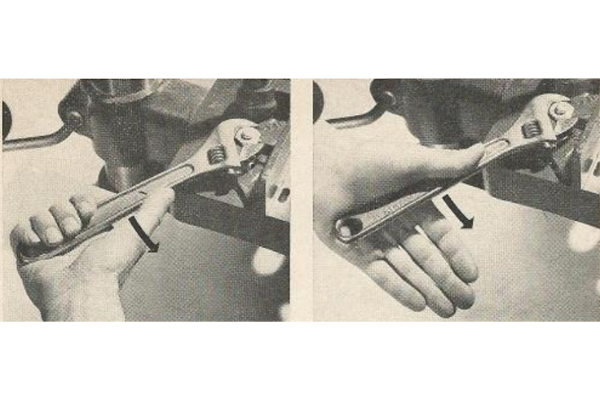
When using a wrench, it’s best to pull rather than push. If you do need to push, use the heel of your hand — that way, if the wrench slips, you won’t bark a knuckle.
Socket Wrenches and Ratchets
f you want something quicker and easier to use, a socket wrench (and ratchet) may be the perfect tool for the job. Look at the image to show its different parts:
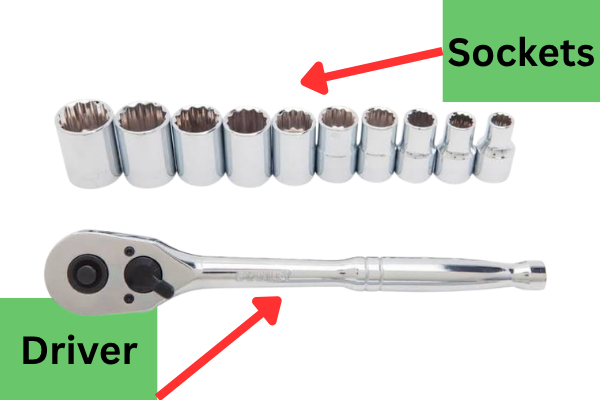
Select the correct socket that fits the fastener that you are trying to loosen or tighten. There is a huge selection of sockets in the Socket Wrench and Ratchet drawer. Attached it to a driver and turn the nob to indicate direction. Be sure to return the tools to the right place in their toolbox drawer when you’re done!
Questions?
That’s Tool Time! Grab a mentor, grab the actual tool off the shelf, and go get hands-on — that’s the only way any of this really sticks. Feel Confident, take the Test. COMING SOON!